
INTRODUCTION
Welcome to your studies in Machine Shorthand.
The shorthand machine requires a light, two handed operation. This prevents physical strain and fatigue, and allows the reporter to reach dictation speeds well in excess of the limits of pen shorthand.
The basis of machine shorthand is that words are written according to SOUND and not the way the words are spelled. Silent letters are omitted. Syllables and whole words are written in one stroke on the machine, and the machine spaces automatically after each stroke is written.
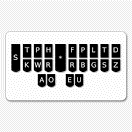
From the keyboard chart above, you will see that the machine keyboard is divided into three sections:
initial consonants, (to the left of the centre asterisk) begin words and syllables and are operated with the fingers of the left hand.
final consonants, (to the right of the asterisk), finish words and syllables, and are operated with fingers of the right hand.
The vowels at the centre lower section of the keyboard are operated with the two thumbs.
The missing letters on the keyboard are supplied by using combinations of other letters. These Initial and Final combinations are set out on the full page illustration of the keyboard which follows.
Each of the 21 letters, (and the asterisk), prints on the paper tape in its own position, and this position never changes. For example, the initial letter S always appears farthest to the left of the paper tape, and the final Z always appears farthest to the right of the tape. If all the letters were to appear simultaneously they would look like this:
STKPWHRAO*EUFRPBLGTSDZ
This unique arrangement of the keys on the shorthand machine keyboard allows the writing of a complete word or syllable in one stroke, in similar fashion to playing a simple piano chord. When writing words which require more than one stroke, the words will be written on more than one line.
THREADING THE MACHINE
Place the machine on its tripod (see illustration on later page). Grasp the knob on the paper tray at the back of the machine and pull the paper tray out as far as it will go.
Remove the wrapper from the pad of folded paper. Take the pad in one hand and gently tap the pad against the palm of other hand to fan the paper and loosen the folds.
Place the pad into the extended tray. Either side of the pad can be used. In fact, for practice purposes, it is economic to use each side of the paper, so you can reverse the pad once it has been run through the machine.
Pick up the loose end of the top sheet of paper and place the edge to the bottom of the platen, that is, the rubber roller situated at the centre back of the machine. Roll the roller away from you to feed the paper through.
Push back the paper holder and thread one fold of paper through, to ensure the correct feeding of the balance of the pad.
Push the balance of the pad to the front of the machine, leaving the tray fully extended to receive the folded paper as you take dictation.
REMOVING PAPER FROM THE MACHINE
At the end of a practice session, carefully tear your notes from the unused paper at a convenient fold, and unthread the paper by pushing the paper holder away from the roller and removing the paper from under the paper holder and from the roller.
It is very important to unthread the paper at the end of a practice session. Paper left over the roller acts like a sponge and may soak up ink which will cause damage to the roller.
The unused paper may be left in the tray which must be closed to allow replacing the machine in its case.
CARE OF THE SHORTHAND MACHINE
To keep your machine free of dust, return it to its case, (or place a cover over it) at the end of practice sessions.
Do not let your machine become dry from lack of ink. Test for proper inking by resting your right hand on the full stop (FPLT) for an instant. If the machine is properly inked, the letters will appear dark and clean cut. With insufficient ink, you may develop the tendency to press the keys harder than necessary in order to make them print.
If your notes are not clear and dark, remove the top plate of the machine and add a drop of ink to each spool hole. Within 2 or 3 minutes, the ink will have been absorbed by the ink pad. A few turns of the spool will then re-ink the ribbon. Repeat the inking process if necessary. Take care not to over-ink the ribbon lest the ink flow into the working parts of the machine.
Do not turn your machine over immediately after inking.
USE ONLY THE STENOGRAPH INK SUPPLIED.
Keyboard tension adjustment
The keyboard tension adjustment knob is found on the right side of the opening under the top cover plate. See the illustration below for the exact location of this small white knob:
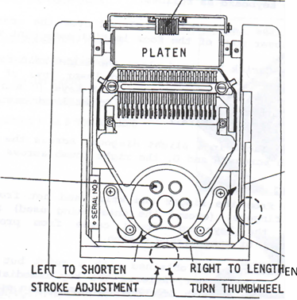
FEED ROLLER PAPER
Turn the knob clockwise to obtain a heavy touch and counter clockwise to obtain a light touch. Do not force the knob beyond the limits of the thirteen turn (revolutions range. You may set this tension adjustment for your particular touch requirements and change the adjustment as often as you desire.
Care of the rubber roller (the platen)
If the rubber roller gets shiny with use, clean it with a lint-free cloth dipped in alcohol. Rub briskly until the roller is DULL.
SITTING POSITION AT THE SHORTHAND MACHINE
Place your machine on its tripod (instructions, following page). The machine on tripod gives the correct height for its use and will protect your hands from possible over-use injury. Do not use the machine on a table or desk as these are too high.
Sit back in your chair with feet flat on the floor, one ahead of the other. Place the machine within comfortable reach so you do not stretch forward to the keyboard. The height of the machine should allow the forearms to remain parallel with the floor when the hands are placed with fingers curved over the keyboard.
The arms are relaxed and held close to the body. The operation of the machine will be through the fingers and wrists, with fingers moving from key to key with minimum hand motion.
PLACEMENT OF FINGERS ON THE KEYBOARD
Your slightly curved fingers should be placed in the home position on the keyboard as follows:
The fingers of the left hand are placed over the crack between the upper and lower rows of the four initial consonant keys.
Disregard the asterisk key, and place the right-hand fingers over the cracks between the four upper and lower rows of the final consonant keys. The fifth final consonant keys (D and Z) remain uncovered. (The little finger of the right hand controls these keys as well as its home keys.)
The thumbs are placed in a slight diagonal across the vowel keys (the left thumb across A and O, the right thumb across E and U).
KEY STROKING
The stroke is from the finger and wrist and not from the arm. Keep all the fingers, (except the ones being used) in position and close to the keyboard. Speed comes from proper finger control, and lack of unnecessary motion.
Clean, clear outlines are obtained with a quick but firm touch with the tip of the finger. Release the key immediately and do not rest on the key or push down on the key as you stroke. To do so increases stress on your fingers and hands and inhibits your speed-building capacity. Faint or shadowed letter outlines indicate incorrect key stroking technique.
Do not pound the keyboard. The type bars are less than 2 mm. from the rubber roller. A very light pressure is enough to depress any key lever. Use a soft, light, relaxed stroke – to save both your own energy, and the mechanism of the machine.
The machine spaces automatically as keys are released. Try to write by touch and not look at your fingers, or the machine, or the paper tape. Your ultimate aim is to write by touch, however, it is quite acceptable, and necessary, during the first two or three months that you will need to refer to the Keyboard Chart.
GETTING STARTED
You are now ready to begin your first lesson, Chapter One of the Machine Shorthand Theory. The recommended procedure is to read through the whole chapter to gain an initial understanding of its scope before working through each individual section.
Chapters first introduce letters, letter combinations, and the “rules” of machine shorthand, then abbreviations and phrases (the vital “time-savers” of machine writing which increase speed) and practice keyboard drills (with taped dictation). The practice drills have a suggested error tolerance, so check your written notes to see you have achieved this skill level before moving on.
Master the theory section of each chapter before starting your practice on the machine. Mastering the letter combinations, abbreviations, phrases, theory rules, before you write, helps you make better progress. This done, your mind is free to concentrate on your fingers. It is wise not to play the tape until you feel confident in your understanding and learning of the theory.
When you have fully understood and practiced the theory for each lesson, open the audio file for that lesson. Work through the word and sentence drills, repeating each drill until you can complete them to the required standard. As soon as you can complete each drill, you can progress to the next lesson.
Self-monitoring of progress
Take meticulous care of your own skill development. When difficulty occurs, work hard to overcome this temporary problem by revisiting and re-learning the theory, before moving on.
Use every opportunity away from the machine to re-learn the vital “time-savers”, the abbreviations and phrases, (presented as a separate list for easy access and learning.) Another important “time-saver” (also a separate list) is the 700 Most Commonly Used Words in the English language, which follow Chapter 20, with transcriptions of audio recorded at speeds from 60 wpm to 140 wpm for repetitive practice and speed building. Also presented as separate lists, are Prefixes and Suffixes and Writing Rules.
For frequent revision, carry these lists with you, as well as a laminated copy of the keyboard chart. This real-size replica is excellent for practising finger patterns and letter combinations when you don’t have access to your machine.
Your Reader is a most important tool. Reading and re-reading internalises word patterns, and embeds the shorthand outlines in your brain, so you quickly become fluent in reading and writing this new language. Repetitive reading and writing is the key to the automatic response which leads to high speeds both in machine writing and reading from your notes. Undertake daily readings. Use spare minutes for this and you will be surprised at your progress. Travelling on public transport, or a few minutes in a lunch break can assist theory learning. Make every moment count!